
7 Track Day Odometer Module Reliability Checks That Matter
Last Updated: November 2, 2026
Quick Summary
A reliable track day odometer module must match your exact vehicle’s signal architecture, be installed with fully seated connectors and heat-routed harness, and hold its reading consistently across a whole day. Verify it with a known-distance test, ten ignition cycles and a full heat cycle before trusting it on circuit.
- Confirm the module is listed for your exact model, year and engine variant before buying.
- Most installations take 30 to 60 minutes depending on dashboard access.
- Wheel-speed modules over-read during wheelspin and under-read during lock-up.
- Cross-check the module total against your lap count to catch missed laps.
- Fit the module at least a week before the event, not the night before.
Table of Contents
- Why Track Day Odometer Module Reliability Is Different on Circuit
- Odometer Module Compatibility: Matching the Module to Your Vehicle
- Odometer Module Installation: Getting the Fitting Right First Time
- Track Day Mileage Recording: Accuracy Under Session Conditions
- Odometer Module Troubleshooting: Failure Modes and Fixes
- How to Test a Module Before You Trust It on Track
- Choosing the Right Module for Your Track Programme
- Frequently Asked Questions
Why Track Day Odometer Module Reliability Is Different on Circuit
A track day odometer module is a plug-in device that interrupts the distance signal reaching your dashboard, so you can run a circuit session or a dyno pull without adding road miles to the clock.
Mileage Blocker modules are designed for dyno testing, diagnostics, and track days. Below are the seven checks that separate a module you can trust on circuit from one that leaves you guessing.
Watch out: the most common failure is not a dead module.
Odometer Module Compatibility: Matching the Module to Your Vehicle
Compatibility is the first reliability check, and it is where most problems start. A module that does not match your vehicle’s signal architecture will either do nothing or throw warning lights, no matter how well it is built.
Before you buy, confirm three things:
- The module is listed for your exact model, year, and engine variant, not just the model name
- The seller can tell you which signal the module intercepts on your car
- The fitting guide covers your dashboard layout and connector type
If you run more than one vehicle, do not assume one module covers both, a 2022 Range Rover and a classic 911 sit at opposite ends of the electronics spectrum. Fitting guides are provided for each supported vehicle, and the fitting guides for dealerships show how connector and routing differ.
Odometer Module Installation: Getting the Fitting Right First Time
Installation quality decides whether a module lasts a season or a single session. A loose connector or poorly routed harness causes intermittent faults long before the electronics give up.
Total time: 30 to 60 minutes for most vehicles, depending on dashboard access.
What you will need:
- The module and its vehicle-specific harness
- Trim removal tools
- A workshop torch
Work through it in this order: How to Install an Odometer Blocker Module Safely
- Disconnect the battery before touching any wiring.
- Remove the trim panels to reach the connector the guide specifies.
- Seat the module connectors fully until they click, then tug gently to confirm.
- Route the harness away from heat sources and moving parts, and secure it with cable ties.
- Reconnect the battery and check the dashboard before refitting trim.
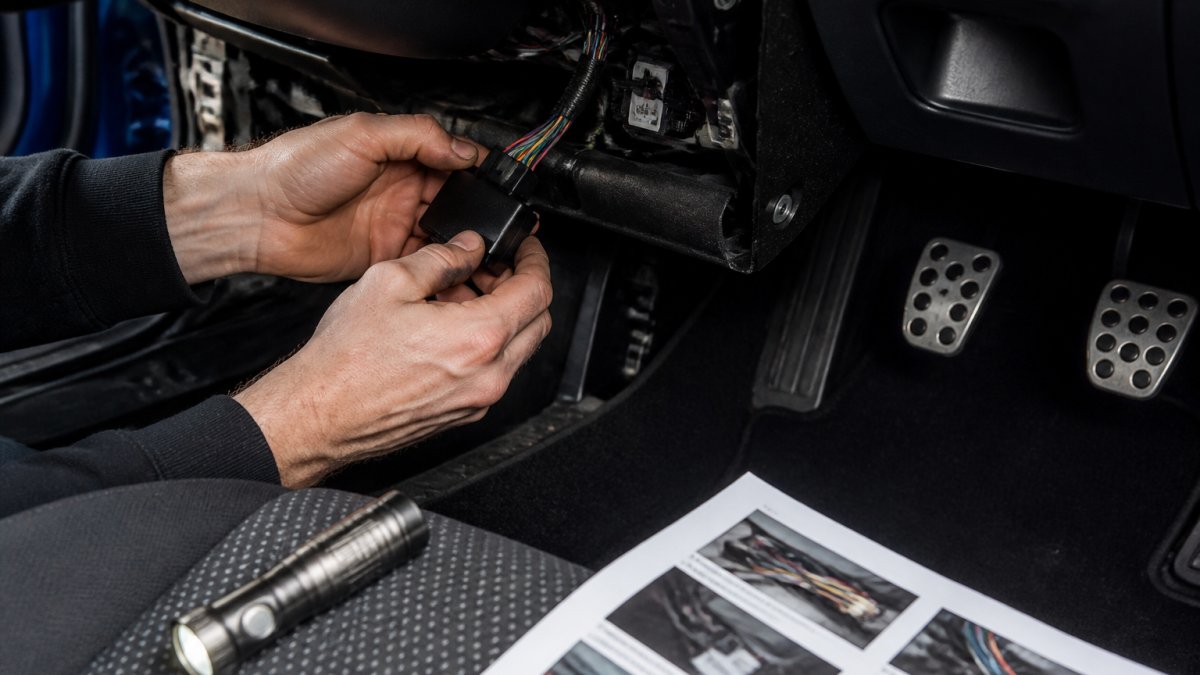
Expected result: the dashboard powers up normally with no warning lights, and the module responds as the guide describes. If you would rather not tackle it yourself, our nationwide installation service lets you add professional fitting at the point of order.
Track Day Mileage Recording: Accuracy Under Session Conditions
Accuracy on circuit is not the same as on the motorway. To judge whether a module is holding, you need to understand what it is counting, a wheel-speed module and a GPS module measure different things and fail in different ways.
What the module is actually counting
Most plug-in odometer modules have no distance sensor of their own. They interrupt or emulate the signal your car already produces, so the recorded distance inherits the accuracy, and errors, of that source. There are three common sources:
- Wheel-speed sensors (ABS rings). The vehicle’s ABS or wheel-speed sensors generate pulses proportional to wheel rotation. Accuracy depends on the programmed tyre circumference: fit a different wheel and tyre package and the pulses-per-mile changes, so the recorded distance drifts unless the module is recalibrated.
- Gearbox or transmission output sensors. Older vehicles often take distance from a gearbox sender. These are mechanically driven and generally stable, but sensitive to final-drive and tyre changes.
- GPS-derived distance. A smaller number of units calculate distance from GPS fixes. These are immune to tyre-size changes but lose accuracy under trees, in tunnels, in pit lanes with poor sky view, and during rapid direction changes on circuit.
A reliable module is transparent about which source it uses on your vehicle. If the seller cannot tell you, treat that as a reliability warning.
Why track conditions distort the reading
- Tyre temperature and pressure rise. A track session can add several psi to tyre pressures and raise tread temperatures significantly. A hot, pressurised tyre has a slightly larger rolling circumference than a cold one, so the pulses-per-mile shifts across a session.
- Wheel and tyre changes. If you run a separate set of track wheels, the rolling circumference almost certainly differs from your road set. Unless the module is recalibrated for the track set, every session is recorded against the wrong constant.
- Wheelspin and lock-up. Driven wheels spin under hard acceleration and lock under heavy braking. A wheel-speed-derived signal will over-read during wheelspin and under-read during lock-up. A GPS-derived signal will not, but it will lag during rapid yaw changes.
A practical accuracy check you can run on the day
You do not need a laboratory to sanity-check a module. Use a known reference and compare:
- Before the first session, note the module’s start reading.
- Run a session of known duration and, if the circuit publishes a lap length, multiply by your completed laps to get an expected distance.
- Compare the module’s end reading against that expected figure. A small discrepancy is normal; a large or growing one is not.
- Repeat after the last session and check that the day’s total reconciles with your lap count.
Keep a simple mileage log for the day: date, start reading, end reading, session duration and lap count. That log is your evidence, if the module is accurate it stays clean; if not, it shows exactly when the reading started to slip and whether drift correlates with heat, a wheel change, or a particular session.
If you change wheel and tyre packages between road and track, recalibrate or re-verify the module against a known distance before the event. A module that was accurate on your road set is not automatically accurate on your track set.
A reliable module holds its reading consistently across a whole day: start reading before your first session, end reading after your last, and every trip record in between should line up with what you actually drove. If distance drifts between sessions, or the display reverts to road mileage mid-day, the module is not holding. Such inconsistencies often stem from poor physical integration or loose connections, necessitating a disciplined approach to verifying automotive parts before they are subjected to the high-vibration environment of the track.
Odometer Module Troubleshooting: Failure Modes and Fixes
Most module faults fall into a handful of patterns, and each one points to a different cause. Work through this table before you assume the unit is dead.
| Symptom | Likely cause | Fix |
|---|---|---|
| No change to odometer reading | Connector not fully seated | Reseat harness, check for a click |
| Warning light on dash | Wrong module variant for vehicle | Confirm compatibility with seller |
| Reading works intermittently | Loose harness or vibration damage | Re-route and secure the wiring |
| Reading drifts when hot | Heat exposure or failing unit | Move module from heat source, test again |
| Module dead after one session | Water ingress or impact damage | Inspect housing, contact support |
| Missed laps or under-read total | GPS drop-out or wheelspin/lock-up | Cross-check against lap count; recalibrate |
| Reading resets to zero or reverts to road mileage | Power interruption or firmware fault | Check battery and earth; re-test from cold |
| Corrupted or implausible trip data | Voltage spike or memory fault | Clear and re-log; replace if it recurs |
The pattern to watch is intermittency. A module that fails outright is easy to spot and replace; one that works nine times out of ten ruins your records because you stop checking it. It is also worth understanding the legal risks of using odometer blockers before you rely on one.
Failure modes in more detail
Missed laps and under-reading. This is the most common track-specific complaint, and rarely a dead module.
Power loss and resets. A module that resets to zero, or reverts to road mileage mid-session, is usually losing supply.
Sensor faults. If the module relies on a wheel-speed signal, a failing ABS sensor on the car will present as a module fault.
Data corruption. Implausible trip data, negative distances, jumps, totals that do not reconcile, usually follows a voltage spike or memory fault.
Recovery procedure after a suspected failure
If a module misbehaves at an event, work through this sequence before you write it off:
- Stop and note the exact symptom, the session, and the ambient conditions, heat, rain, kerb strikes.
- Power-cycle the vehicle and confirm whether the fault clears from cold.
- Inspect the harness for chafing, loose connectors and heat damage.
- Run a known-distance road test and compare the module reading against the reference.
- If the fault recurs, remove the module and contact support with your log.
Do not keep running a module that is producing implausible data. A module that half-works is worse than one that fails outright, because it leaves you with a mileage log you cannot rely on and no clear point at which it went wrong.
What ‘reliable’ should mean in practice
Reliability is not a spec-sheet claim; it is a pattern of behaviour you can verify. A module that survives a week of road use, a full heat cycle, ten ignition cycles and a known-distance test has demonstrated the basics. One that also holds its reading across a full track day, with drift attributable to measurement method rather than fault, has earned a place on the car.
How to Test a Module Before You Trust It on Track
Testing is the step almost everyone skips, and it separates a reliable module from a hopeful purchase. Run a structured check before any event, not on the morning of it.
Use this pre-track checklist:
- Fit the module at least a week before the event, not the night before
- Drive a known route of a set distance and compare the odometer change against it
- Run a full heat cycle: a long drive, park hot, then check the reading again
If the module passes all six, it has earned a place on the car for track use. If it fails any one, fix it now rather than discovering the fault at sign-on.
Choosing the Right Module for Your Track Programme
The right module for track work is the one you can verify, not the one with the longest feature list. Reliability comes down to build quality, vehicle matching, and support you can actually reach.
Mileage Blocker modules are UK-made, offer plug-and-play installation, and come with a 12-month warranty and 24/7 support, which matters when a module fails at an event. Our modules are designed for dyno testing, diagnostics, and track days.
For vehicles that see demanding conditions beyond the circuit, our guide to mileage management for off-road vehicles covers the extra checks that apply.
Frequently Asked Questions
Are odometer modules reliable during track days?
Reliability depends on the module and how it is fitted. A track day odometer module should only intercept distance data and be fitted correctly to avoid problems. The risks come from cheap units with poor calibration, loose connections that vibrate loose under load, and modules not matched to the vehicle’s protocol. Test the module on road first, check for stored codes after each session, and keep a written log of start and end readings so any drift is spotted early.
How can you check whether an odometer module is compatible with your car?
Start with the vehicle’s year, model, engine and ECU type, then confirm the module’s supported protocol list covers it. Odometer module compatibility is not just about the connector shape: can-bus and newer encrypted networks vary between models and even trim levels. Ask the supplier to confirm your exact vehicle, check whether one module covers both a modern daily driver and a classic, and verify the fitting guide matches your dashboard layout.
Can a mileage module affect a vehicle’s other electronic systems?
Problems appear when a unit draws power incorrectly, back-feeds a circuit or interferes with the can-bus. Symptoms include dashboard warning lights, infotainment glitches or limp mode. After odometer module installation, run a full diagnostic scan and drive a short mixed route before any track session. If codes appear that were not there before, remove the module and contact the supplier rather than pushing on.
How should you test an odometer module before a track day?
Do a staged test rather than fitting it on the morning of the event. First, install it and complete a static scan for fault codes. Second, drive a known route of at least 20 miles and compare the trip record against GPS to check accuracy. Third, run a full heat cycle, including a period of idling and a harder drive, then re-scan. Only after the module passes all three should you rely on it for track day mileage recording. Log the date of drive, start reading and end reading each time.
Track days punish weak electronics, and a module that drifts or fails mid-event leaves you with records you cannot trust. Mileage Blocker builds UK-made modules with plug-and-play fitting, a 12-month warranty, and 24/7 support, so your mileage stays controlled from the first session to the last. Get started with Mileage Blocker and fit a module you can verify before you trust it on circuit.

Leave a Reply